Just a quick note cause I’m so excited about the following two services:
Amazing Marvin has just about everything I need t manage my tasks, including time tracking and pomodoro timer. And the team that is building the tool is absolutely amazing (just look at their changelog!
and
SkedPal is an auto-scheduler which automatically schedules and reschedules your task based on various Time-Maps.
I don’t even have time to add images to this post at the moment but I thought if I don’t write this post now, it’ll probably be another month before I do it. Please do let me know if you have used either of these and what your experience was.
Note: The link to SkedPal above is an affiliate link which gives both you and me a 10 percent discount on the subscription. Note, however, that I am, not yet ready to give an informed opinion about how well it works. But if you’re willing to give it a try, you might awell use the discount link. 🙂
I’m enjoying the small conversations that are going on in the comments to the various blog posts (thank you all for contributing!!) and I want to take these kinds of interactions one step further, so I created a proper discussion forum (or rather, a sub-section of a larger forum) and I invite you all to not only comment on the blog posts but also initiate your own discussions on the forum (and I will probably comment on them).
I think there is much need for communication and mutual help around software in academia, but since we academics are usually quite specialized (and everyone has their own quirks and preferences), it’s not always easy to find peers facing the same kind of software related challenge. So let’s see if that forum (which also has a section about Academic life more broadly) can facilitate that kind of dialogue. Don’t be afraid to be pioneer and make the first step. If there is something on your mind, please create a new topic and we’ll see where it takes us.
But there is one limitation with Everything: Setting it up so that it also searches the contents of your files is not easy and when you have it set up and it finds a file based on a search term it contains, it still won’t tell you where in the file you can find the term. You will have to open the file and do another search within the file.
Not a big deal, you may say, but a couple of weeks ago, I discovered Noggle and I’d like to encourage you to try it out (and report back here, if you like). I have not yet used it enough to give a final verdict, but I looks like it pretty much beats any other desktop search program I’ve tried. And: it’s free for non-commercial use.
Unfortunately, the UI diverges a lot from the standard Windows experience so that you’ll have to experiment amd try stuff out a bit. I suppose you get used to it after a while.
UPDATE 13 january 2019: On my computer, Noggle hast started to use loads of CPU power while indexing seems to have gotten stuck.
UPDATE: 19 february 2019: I mentioned earlier that Noggle may have become abandonware because I had difficulties getting a response from their support. While support later did get back to me and we managed to get rid of the high CPU issue, but I’m still unsure about whether Noggle is still being actively developed. I anyone knows more, please comment below.
I recently noticed that TimeCamp, the time tracking tool that I’ve been using for almost two years now has introduced a discount of 50 percent for non-profits, universities, students and schools. And that is 50 percent on top of the 25 percent that you get if you pay yearly. So that means, you currently pay 3.50 USD per month if you pay monthly or 31.50 USD for a yearly payment, which is 2.63 USD per month.
If you want to know why I prefer TimeCamp over other time tracking services, check out this blog post, where I go into details. I want to emphasize, though, that TimeCamp is not perfect. For example, they do have server outages every now and then and although their integration with Asana is better than any other time tracking service, there are still problems like the occasional orphaned timeentry (although the task is under a project in Asana the time entry in TimeCamp has no parent), which messes up your entire stats. Indeed, for anyone whose income depends on correct time entries and correct calculations of durations, I cannot recommend Timecamp because it has repeatedly produced faulty reports so that you really need to double and triple check your data before you can really believe it.
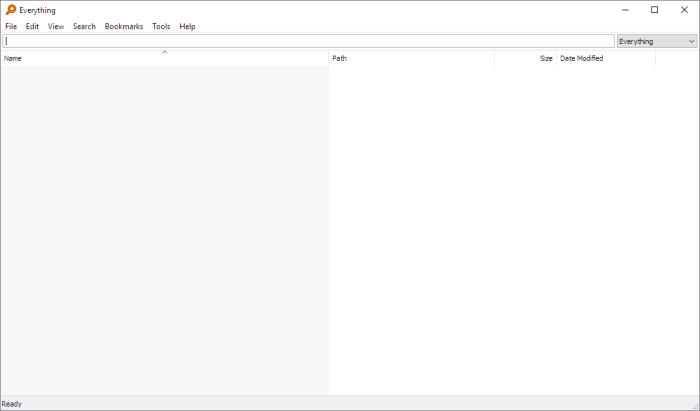
Haha, what a weird title! So let’s get this straight first: with “Everything”, I mean this little freeware program called Everything, which allows you to find any file on your computer within one second. Literally. I’ve been using it for years and it’s about time I mention it here. You just press a shortcut of your choice (In my case: Ctrl + Shift + J), a search window opens:
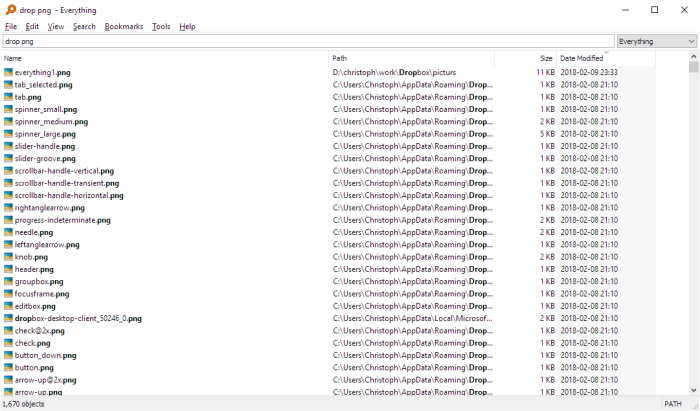
You start typing whatever you remember about the file, say, you know it’s in your dropbox and it’s a png file, so you type “dropbox png” (without the quotation marks) and it will immediately show you all png files in your dropbox (make sure you have “Match Path” activated in the Search Menu):
As you can see in the screenshot, you may not even have to type the whole word dropbox. – Of course, if you know the file name (or parts thereof) you would type that. Doubleclick the file to open it or drag and drop it into your email to send it off or whatever you want to do with it.
Now, everything has its limitations, and so does Everything: it only indexes file names and paths (i.e. the folders and sub-folders where the file is stored). So when I found out about two desktop search engines, Lookeen and X1 Search, which will even index the contents of your files, I was enthusiastic about the possibilities that would open up, for example to search all my pdf journal articles for a particular word or phrase.
So I tried both. And both were a nightmare. Both of them kept using a significant proportion of my CPU for several days, allegedly still indexing all the files, but eventually I figured out that since X1 was not accessing the disk at all, it must have crashed. I went back and forth with their support for a while, but to no avail. The user experience was crap, even when I finally did manage to get it to finish indexing and could run som searches. One problem was that some pdf files were not displayed properly, it was just a mess of letters and symbols (though I think that was eventually fixed, if I remember correctly). Like this:
But the main problem is that if the pdf is a scanned document, it will only bring you to the page where your search term is, but it won’t highlight the term (the pdf viewer they use can’t do that kind of overlay over an image, as explained here).
Lookeen wasn’t any better. It never stopped using CPU and I’m not sure if it ever managed to finish the indexing job, but I did conduct some searches and here the problem is that it doesn’t even take you to the page in the document where your search term is. The email search in Outlook didn’t work properly (worse than Outlook’s own, if you know what that means).
Sorry, this is not a proper review but I just couldn’t be bothered to write it up, because the verdict is just so clear: don’t bother. Or if you do want to try either of them and you encounter problems, just uninstall. Otherwise you’ll just waste your time. If, however, you do not encounter issues, please comment below and let us know.
The main point of this post was, however, not to bash X1 search and Lookeen, but to praise Everything, which just works (and it just takes seconds until a newly created file is available in the search).
A commercial alternative to Everything, btw, is Quickjump. It does exactly the same as Everything and it works fine (I used it for quite some time before I found Everything) but it’s not as flexible as Everything (which lets you customize a lot!), so I don’t see why you’d want to spend 30 USD on something you can get for free. Thank you to David Carpenter and the other contributors for giving us that nice piece of software!
I just discovered this tool called Weava that helps you annotate websites and pdfs and collect the snippets that you highlighted on various pages. I have hardly tried it yet but thought I’d briefly mention it here because what I have seen so far looks really exciting. It’s pretty much what I’ve been looking for since years.
As you know, it is easy to discover ever new things or snippets of information on the web (including on the websites of academic journals where you went for one article but end up finding three others). What happens is that I end up having about 356 open tabs in my browser because I don’t want to loose whatever I just found but I don’t have time to look at it more closely now. Yes, that’s what bookmarks are for. But bookmarks only save the link to the whole page. With Weava, you save the snippet of information that is relevant on that page.
Anyway, I don’t want to convince anyone. That bookmarking use case is not even the primary use case for which the app was designed. They started off wanting to help students do research online as well as – perhaps more importantly – systematically read and annotate pdfs, perhaps even collaboratively. And then they noticed that not only students are using it…
To really answer the question in the title, some more research needs to be done, because, of course, Weava is not alone. Here is a list of Weava alternatives that probably should be part of a comparison:
I’ll stop here because the list could be continued almost indefinitely. So what do you do when there is such a large number of similar services to compare? I don’t have time to look at them all (but see here for a previous little review I did). So in those situations I try to find open source or at least non-profit projects that seem to be active and promising. And in this case, these would be Zotero with Zotfile and hypothes.is.
If you have some experience with any of these, please share it, even if it’s only a brief “why I like it” or “why I don’t like it”.
I have been tracking my time for almost 9 years now and I have changed systems several times. I have also used various task management (or project management) tools in the past years and since about a year or so I have managed to integrate the two. In this post, I wan to share my experience and perhaps make your choice of tools a bit easier.
I will mention the tools I have used in the past only briefly and the suggest three scenarios which I think are the best solutions you can find these days, depending on your needs. If you can’t be bothered reading the whole story, here is the gist of it (or tl;dr):
Scenario 1: If comprehensive time tracking is not so important for you and you are mainly looking for an easy way to keep track of your task, KanbanFlow is for you. The free version is perfectly sufficient for scholars but when I used it I actually signed up for the paid plan (5 USD per month) because I liked the swimlane feature.
Scenario 2: If you want to track your time throughout your workday, get a visual idea of how you spent your day (or week) and integrate that with your task management tool, then your best solution is using Asana for your task management in combination with TimeCamp for time tracking. Asana is free for up to 15 people, so you can even use it to coordinate work in a team but you’ll need to pay 6 USD per month for TimeCamp if you want to integrate it with Asana.
Scenario 3: If you are just looking for a time tracking tool and keep your task management entirely independent from that, I suggest you go for Yast. As an academic (student/teacher) the developer will – upon request – give you a free premium account (which normally costs 6 9 USD per month) but you may not even need that if the free account works fine for you.
So much for the quick summary and recommendations. Now comes the whole story.
Timepanic
Sample Screenshot from the developer’s website
I started using TimePanic back in 2007 simply as a means of finding out where all my time was disappearing to. At the end of the workday I often found that although I was certainly busy the whole day, it felt like I hadn’t really achieved as much as I wanted and wondered what I had used my time for. TimePanic is an offline Windows program that allows you to define certain keyboard shortcuts for switching to a specific task,
(For example, I had one of the F-keys set to “Chat with colleague” because when a colleague walks into your office to ask you something, you don’t want to start clicking all over the place to set your time-tracker to “Chat with colleague” before you actually react to him or her. So a simple key press would achieve that. And if you want to track who you actually spoke to or about what, you can fill that in afterwards)
and which shows allows you to produce detailed reports about how much time you spent on which task or project or how you spent your day or week or whatever. You can also define a day as a holiday or sich-leave or vacation etc so that you don’t end up wondering why you worked so little in August 2009 or so. (This feature is actually something I miss on all other time tracking tools I have used and tried so far!) Timepanic’s price is not cheap at 39 EUR but I have never regretted spending that money, even on my tight PhD student budget at the time. The developer was very responsive when I had questions or suggestions and the software was very user-friendly.
The most interesting (and somewhat ironic) effect of starting to track my using TimePanic was that I became much more aware of what I was doing already while I was doing it, simply because I had to log it. And perhaps more importantly, I became very aware of distractions (self-distractions and distractions by others) as well as any change of task, again: because I had to log it. It’s a nice example of how the measurement changes what it measures. (They observed the so called Hawthorne effect already decades ago with industrial workers, but it’s something else to actually experience it in yourself!)
So for anyone wondering whether time tracking is really worth the effort when you can’t use it to bill anyone, consider this self-disciplining and consciousness raising effect. Indeed, I rarely actually run any big analysis on my time-tracking data (although I do intend to do a little longitudinal study over the years one day. When I have time 😉 I just look at the day and the week and 80 percent of the time I’m only interested in the total time worked. Not even the project, let alone the task break down. But I do look, for example, at how much time I spend to peer review a paper – 8 hours! And I can’t seem to be able to do it much faster 😦 – or on publishing a paper (170 hours), but checking these things remains the exception. It’s just too frustrating to see how much time stuff actually takes!
Another reason to track your time as a scholar is to get rid of that bad conscience of not working enough. Or you might even be able to use your figures in negotiations with colleagues about how much time should be allowed for what kind of task. This may not be relevant in many parts of the world, but at Swedish Universities, your employer actually keeps track of your workload (and hence how many more tasks you should take on in a certain time period) and they use certain standard rates to estimate your workload. For example, at my department, correcting an exam gives you 20 minutes (sic!) and for giving a 1 hour lecture, you get paid 4 hours etc. When such rates are negotiated, being able to say “I have been tracking my time over the past X years and based on that this kind of committee usually takes X hours or work” might actually have a certain weight.
I left TimePanic because I wanted a graphical representation of my daily timeline. I wanted something like this:
Yast’s visualization displays of how you spent your day is quite unique in the diverse world of time-trackers
I asked the developer and since it wasn’t on his roadmap at all, I decided to go online, even though I would have preferred to be independent of the internet when it comes to time tracking (yeah, I know. But, hey, this was in 2011/12 when people still had a life outside the internet!).
Criteria for an online time tracking tool (choosing Yast)
I tried out a whole pile of online time tracking tools (and the number has multiplied since!) and thanks to Evernote, I still have my list of features that I used when comparing various options. Here it is (with some quick comments added):
many projects, tasks and sub-tasks (and sub-sub-tasks…)
All tools offer that, but the question is whether and how much you have to pay for it. Sometimes the free plan is limited to one or two projects (like Harvest or Freckle) or don’t allow sub-projects/ tasks (like Toggle).
logging of time of day (not just duration)
Many online tools (including KanbanFlow or Freckle) allow you to aggregate the time you have spent on a specific task, but they will not remember when you spent that time. Which implies: there is no time-line like the one shown above. At best, you get pie charts of how much of your time went to which project etc.
easy switching between tasks/activities
after all, I’m gonna do that multiple times a day and ideally it should take zero seconds to so it. With it’s shortcuts-feature, TimePanic is probably still best at that. Because it is running on your computer, you can use global shortcuts to control it even when it is running in the background. With web-based applications, you have to at least bring your browser to the foreground and click some button. But the point with this criterion is basically that there should be a list of recently used or favourite tasks that I can start by clicking on them and starting one will automatically end the previous one.
graphic display of projects over time (stacked)
I think what I meant by that was that I would like to be able to see, say, over the course of a year, which projects I was mainly working on each week or so. I don’t think I found this in any tool I looked at.
android app or at least good mobile browser interface
If I’m going online, I at least want the benefit of being able to log my time also when I’m not at my desk but, for example, doing field work. Also good when you leave the office in the evening and notice you didn’t turn off the timer…
note or comment field for each logged activity
This helps you to better understand afterwards what you were actually doing. I use it especially for big chunks of work (several hours), also to indicate that this record is correct on not a mistake of a forgotten timer. Having a comments field also prevents you from breaking down your tasks into too many small tasks. For example, if you have a task “write review for article XYZ” you might be inclined to have sub-tasks like “read the manuscript” and “write comments to authors” and “write comments to editor and submit”, but with comments, you can just write that into your comments field (unless you really want a formally exact break down of how much time you spent in each)
defining the activity before it ends
This may sound strange, but I have seen tools where you just start a timer and only when you stop it will you be asked to say what you actually did during the tracked time. I don’t like that, not only because it defeats the disciplining effect mentioned earlier, but also because when I move on to the next task, I don’t want to thinking and writing about what I did but about what I’m about to do.
offline use possible (cache or whatever)
I you’re tracking online, an internet or server outage just 30 minutes will interrupt your workflow and create extra work to fill on the gaps when the connection is back. Unfortunately, Yast had quite a few server outages and does not have an option for offline use.
Not too business oriented
The thing is, most time trackers are designed either for freelancers working for clients or companies tracking the time of their employees (or a combination thereof). Since this is not what we do as scholars, we need to adapt these systems for our purposes and I’m fine with that, especially as long as I’m on a free plan. But there are limits to what I’m willing to use. For example, it’s fine to have an option to track time not only against projects but also against clients, but if the user-interface is designed in such a way that I am constantly asked to enter the client details or I even have to make up mock clients so that it works, then that tool is not for me. And then there are many tools that are more focussed on facilitating billing rather than tracking and analyzing time use (e.g. MakeSomeTime)
Low cost
Since I won’t make more money because I track my time, I don’t really want to pay a lot for this, perhaps I can even get it for free?
I will spare you all the details of my notes (which are four years old now). Suffice it to say that I eventually chose Yast because it fulfilled criteria 1, 2, 3, 5, 6, 7, 9 and 10. I can still recommend it if you don’t want to integrate your time tracking with your task management too (scenario #3 above). So here it is. This is what it looks like:
The Yast user interface (At the top, I chose the weekly timeline view for this screenshot, as opposed to the single day view shown above)
KanbanFlow
Now, lets leave time-tracking aside for a moment and look at task-management. Until a couple of years ago, I was not using a particular task management system or tool but some combination of Outlook tasks, Outlook Calendar and some kind of lists (even on paper, yes!) But then I learned about the kanban method which apparently originated from lean manufacturing in the automobile industry, was then adopted in software development less than a decade ago. Although the original idea was to coordinate tasks and workflows in teams by visualizing them on a whiteboard, the Kanban was soon adopted to the personal level: the personal kanban. And while you can do this with paper notes on a pinboard, the digital version obviously bears a lot more potential.
So I looked around and tested quite a number of online kanban tools (such as: Kanbanery, Pivotal Tracker, Agile Zen, LeanKit Kanban, Kanban tool, kanbana, targetprocess, and, well, Kanbanflow). I will not go into any comparison here because I think for scholars the best choice is by far KanbanFlow and if you do a bit of comparing yourself, I am quite confident, that in the end, you will agree with me (please leave a comment below if you don’t – or if you do!)
The fact that KanbanFlow is the only Kanban tool with an integrated Pomodoro timer is already a fantastic advantage over other tools (find out more about the pomodoro method here). In addition, it allows you to track how much time you spent on each task, simply by clicking a button on the task-card (which you obviously are looking at anyway, when you are working on that task). I already mentioned the (paid) feature of Swimlanes which I used to separate teaching, administration, and various research projects from each other.
So I used KanbanFlow as a task-management tool for quite a while in combination with Yast as a time-tracker and it works fine. But at some point I noticed that I am not really using KanbanFlow for all my tasks. Sometimes I wouldn’t open it for days because I knew exactly what I had to do during those days anyway. But that also meant that I wouldn’t rely on it as my main task list, as the place to write that important thing that must not be forgotten, because I could not be sure that I would look at it when that thing needed looking at.
At first, I considered using the then new time-tracking feature in KanbanFlow instead of Yast so that I would open KanbanFlow first thing in the morning in order to start tracking my time. In order to do that, I would need to put all my tasks into KanbanFlow, and that’s where the problem started. The hierarchy of projects, sub-projects, tasks and sub-tasks that I had built in TimePanic and Yast over the years was quite complex and KanbanFlow wasn’t built to accommodate that kind of complexity in one Kanban board. The idea in KanbanFlow is to have one board per project. Technically, this is not a problem because you can easily create as many boards as you want. But I did not want to switch between boards, for example, when I finished preparing a lecture (in the “teaching” project) and start to prepare the interviews for a research project. And imagine the hassle when I student (teaching project!) comes in while I’m working on those interviews).
Besides, Kanbanflow’s time tracking is still rudimentary and since the developer said that this isn’t going to change in the near future, I decided to look for another solution. I still like Kanbanflow very much and may well change back to it once it’s time-tracking is a bit more sophisticated. So if time tracking is not a priority for you – perhaps you only want to know the time you spent on certain tasks but not on others? – then I suggest you should give KanbanFlow a try.
For me, abandoning KanbanFlow unfortunately meant that I would also leave Yast due to its lack of integration with any other online tools which made it impossible to find a task manager that would link to it.
The solution I came up with after some comprehensive testing and which I am still using today is Asana in combination with TimeCamp. I hope to write about this setup in more detail in a separate post (please comment below if you’re interested in reading it), so I will keep it short here.
Asana and TimeCamp
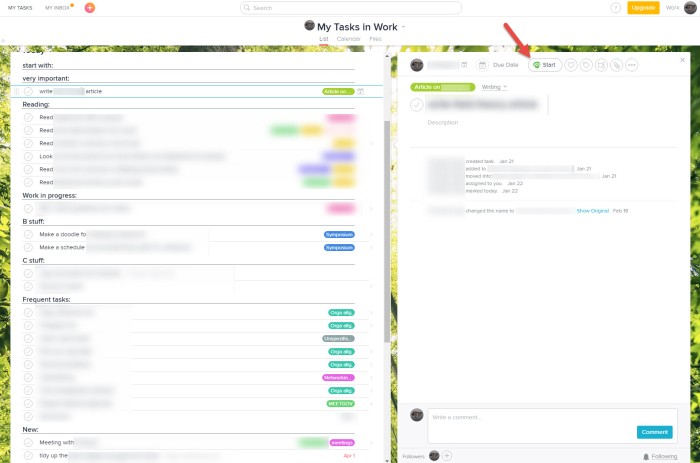
The beauty with this combination is that TimeCamp offers a browser plugin (Chrome only!) that puts a time tracking button on each and every Asana task and when you click it, it starts/stops tracking time against that task in TimeCamp. Like this:
The (very customizable) Asana user-interface with the TimeCamp tracking button. On the left is the task list and on the right are the details of whichever task you select from the list.
This means that I don’t even need to open TimeCamp any more except for reporting purposes, i.e. if I want to know how much I worked on that day or whatever. Most of the time, I am only looking at Asana and tasks or projects I create there are automatically transferred to Timecamp and when I move them around in Asana they are also moved around in Timecamp so that my Time-Tracking and my task hierarchy are always in sync.
If you want to give it a try, please use this referral link to sign up. And let me know if you want to know more about this setup. It might encourage me to actually sit down and write it.
I just realize that with this referral link at the end, this looks like I wrote this whole thing only to get you to sign up for TimeCamp. But believe me, I have long planned to write about this and I only recently discovered that Timecamp have a referral program, so rest assured that my review here has not been biased in any way by the prospect of getting a reward for referrals. In fact, I still have some critical remarks to make about TimeCamp, but they won’t deter me from recommending them and I need to catch some sleep now. In the mean time, feel free to ask questions below, which can guide me when writing my next post.
Social scientists are increasingly using video cameras as a tool for data collection as it allows them to go back to certain interesting moments and study them in much greater detail than would be possible based on written notes or memory. So how do you find those important moments in your hours of video footage? Of course it’s possible, to do it from your memory of when in the sequence of events it happened or because you noted down the time. But I found this method somewhat laborious and I wanted to find a way of “synchronizing” my field notes with the video footage.
I would have loved to use the solution provided by a new free software called Chronoviz which integrates all kinds of time coded data, including my Livescribe Pen. The problem is, I am on Windows and Chronoviz is only available on Mac. But if you are on a Mac, you may not have to read any further and head directly off to the Chronoviz website and try it out. (And feel free to share your impressions in the comments below!). For the rest of us Windows folks (or for the Mac folks who might want something much more simple than Chronoviz) here is how I just solved this challenge for myself: it’s a simple Excel spreadsheet (three to be precise).
When you open it, it looks like this:
The first version of Eventlogger before entering any data
As you can see, it’s still under development, but the basic features should work. Here is how you use it: enter something (it doesn’t matter what) into the green field (E2) and hit enter at the same time as you start your camera(s). You will get something like this:
Eventlogger after starting the video recording
Now you can take notes in the blue-white striped table and whenever you enter an event (in the Events column), the time of the event will be logged in the Time column and the Video Timestamp column will show the respective time code on the video (i.e. the time passed since the recording started).
The time of an event is logged when you navigate away from the event description
As you will notice, the time for an event is logged only after you wrote something into the event-column and hit enter. So if you intend to write a lot about a particular event (and therefore will hit Enter only after the Event is long over), you might want to adjust the logged time manually. But please do this using the column “Manual time” on the right. These Time and Timestamp columns should not be touched at all, they are entirely automated and messing with them will probably mess up your log.
Instead of changing the time manually, it might be easier to develop a habit of hitting enter after writing the first few words and then navigating back to complete the entry. Or you could use the “Event” column for a short description and elaborate in the Notes column. In that case you will hit Tab instead of Enter, which will also create a time log.
And there is another way to adjust the logged time. You can also set a permanent offset in the Config-tab (another spreadsheet underneath the main one). For example, if you set the offset to 20 seconds, the time logged will be the current time minus 20 seconds. I find this useful because when you eventually use the time code to jump to the corresponding moment in your video, you will not have to manually move back another bit in order to see the moment that actually triggered you to take note of what happened.
The rest is pretty self explanatory. You just go on taking your notes (don’t forget to make sure that autosave is enabled while you’re in the field. Otherwise you risk losing a day’s work.
Once you have logged your events, the next step is to import them into whichever CAQDAS package (Computer Assisted Qualitative Data Analysis Software package) you are using to analyze your videos. I use Transana, so that’s what I will describe and that’s what the Export format of the Eventlogger is designed for at the moment. But it should be easy (if not unnecessary) to adapt it to another software like NVivo, MaxQDA, or Atlas.ti.
So here are the steps to get import the logged events into Transana:
Hide the Column C (“Time”) by clicking on it’s header (and thereby selecting it), right clicking it and selecting hide. (If you want to keep the “real” times for each event in your transcript, skip this step). To unhinde it again, select column B and D, right click and select “Unhide”
Select the area of the table that contains your data as shown in the screenshot below, copy it, and paste it into a new Transcript window in Transana (or any Text document that you can later import as a transcript). If you are using a text editor like Word which understands the formatting of what you paste, make sure you “paste as text”, cause you don’t want a table.
To export your data, simply copy and paste it your CAQDAS.
In Transana, you then use the “Text Time Code Conversion” tool which will convert the time stamps from the Eventlogger into Transana time stamps and link them with your video. Now you can easily navigate to each of the special moments you observed in the field, simply by clicking on where you describe that moment in the transcript.
Surely, the export function could be more luxurious and I have fiddled a bit with automatically importing the data into a Word document (via a Mail merge directory), but so far this solution is very context dependent and therefore not fit for sharing. And the advantage of the copy&paste solution is that not much can go wrong. So go ahead and give it a try. Let me know if it works for you.
The original Eventlogger file is an .xlsm file (excel file with macro) but for some reason WordPress won’t allow me to upload xlsm files, so I change the ending to .xls. If you open the file as it is, Excel will give you a warning message that the file content does not match the file type. If you just accept that an allow Excel to open it, will work fine. But you can avoid this by just renaming it to .xlsm before opening it.
As you can see in the Screenshot above, the size of the stripy table is somewhat limited, but don’t worry. The table expands automatically as soon as you start writing into the first row below the table. (UPDATE: I just realized that this auto-expansion is currently not working. So you need to expand the table manually for the time being.)
When you open the Excel file for the first time, it will warn you that it contains a Macro and it will block this macro from being executed until you give it the permission. You don’t have to activate the Macro, but then you will have to manually change your Excel settings to “Enable iterative calculation” by going to Options => Formulas => Enable iterative calculations (see here with pictures). The Macro does this for you automatically. Nothing else. Without this setting, the whole thing won’t work.
The timestamp format that Transana reads is h:mm:ss.sss. Note the dot before the sss. If you open the Eventlogger and you see a comma or something else instead of the dot, that is because your computer’s “decimal symbol” is set to something else than a point. To change this, in Windows 7, you need to go to the control panel => Region and Language => Formats => Additional Settings => Decimal symbol. I suggest you change also the “Digit grouping symbol” in order to avoid confusion. (But this has nothing to do with the Eventlogger.)
I liked Crocodoc personal, in fact, I found it a quite fascinating tool as it mad it very easy to have several people comment on and discuss any pdf document. But apart from suggesting it to students as a tool for their group assignments, I didn’t really use it a lot. Also because already more than I year ago, it somehow looked like a neglected side product that may be shut down any time. And now my suspicion was confirmed in an email from the Crocodoc founders, announcing that Crocodoc personal will be shut down on 1 November 2015.
This prompted me to search for alternatives to Crocodoc and this post is a first and somewhat preliminary review of what I found. I was surprised to see how the market for online annotation services has changed in the last year or two. When I found crocodoc in late 2013, it was one of two serious competitors, at least when it comes to free services, but I think even among the paid ones, I could not find anything that might have suited me. I was looking for something that would make collaborative reading of texts possible for students and which would allow colleagues to quickly scribble some comments into a draft document. Here are my brief notes that I took down at the time:
diigo doesnt seem to support pdfs properly (although its apparently possible)
a.nnotate seems great for pdfs, but free version only allows 30 pages per month
mendeley would be excellent but free version only has one private group with max 3 members
crocodoc: also looks good but I cant get the annotations to work on the ipad. need to check on PC
So the only serious contenders for me were a.nnotate and crocodoc at the time, with my final preference clearly being Crocodoc.
Annotate has now launched a more attractive service called Annotate.co. It is certainly worth looking at, but two things turned me off right away: first, the free version only allows two users (and every commentator is a user) and the paid version is catered more towards business/ work teams and would be too expensive for whole classes of students, let alone schools.
Apart from Annotate, there are Notable PDF, iAnnotate, and Notable. I’m trying not to spend too much time comparing stuff, when it’s not necessary. Looking at the four of these pretty quickly let me settle for Notable PDF for the time being in order to try it out.
Notable is good if you want to share among a virtually unlimited number of people and are prepared to pay US $19 for that. It might even be possible to use one such paid account for several classes/courses, but I didn’t check how exactly this would work in practice. There is also a free account with “limited features” but I couldn’t find any information about what features actually are included. Anyway, the reason I am not exploring this further at the moment is that even in the paid plans, you can only leave comments on the documents- That’s it. And that’s not enough for me. I want highlighting and free drawing on the page in addition to Word-style comments. At least.
So, what’s wrong with iAnnotate? We’ll it’s pretty easy: it’s only for iOS and Android. Not for desktop PCs, i.e. no web-interface. No need for me to look any further further. But this minus can surely be a big plus if you need something that works well on your tablet or phone. I yet need to check how well Notable PDF works on those mobile devices.
As you can see, although there is a better variety to choose from it’s still pretty easy to make a choice. I will explore Notable PDF from now and I’ll let you know whether I ended up integrating it into one of my workflows and how. But since I wont be doing any teaching for a couple of years, I will not be testing it for teaching. Only research. Please leave a comment below if you have tried it for teaching. I am really curious if this could be a tool for teaching students how to read academic texts, basically by reading them together.
What I like about Notable PDF is that it can also function as your pdf Viewer (at least on Chrome) so that any pdf you open on the web will be displayed in Notable PDF, which means that you can start annotating it right away. However, I am currently using Adobe Acrobat Pro as a viewer (and editor) so I’ll have to see whether Notable PDF can really compete with this. But if you don’t have Acrobat, chances are that you will like Notable PDF better than the internal pdf viewer.
What also makes Notable PDF attractive for teaching is that it has a dedicated classroom plan for 2 US$ per student per year. It looks like the free version can bring you quite far as an individual and if you need more, the monthly plan for individuals is just $2. What I’m not sure is how well either of these versions will work for teams, i.e. peer collaboration. They have (more expensive) plans for that too, so there must be something that these plans have that the others don’t. Time to explore. Please share your views and experiences on this too
This is a follow up to my previous review posts (1, 2) on the Xcanex document scanner from piQximaging. Just a quick one. As you know, I like to complain about everything that doesn’t work perfectly, so this is of course about some more complaining…
But before I start complaining, I also need to say that I have come to appreciate the scanner to make a few scans here and there: e.g. the when I was ripping some CDs the other day, whose covers I could not find online, I just flipped them under the scanner and it was just a matter of seconds until I had the cover image saved with my ripped audio files. Or some of those official letters that you don’t know whether you will ever need them – probably not – but you don’t want to have them pile up on your shelf: I now just scan them, save them in Evernote or wherever, and get rid of the paper copy. I’m starting to think, maybe I would actually spend those 300 USD for the device (mine is a review copy).
But I guess I’d do some comparison work, especially regarding scan quality. In my last update, I already showed illustrated the limits of the device compared to a professional photocopying-machine-scanner, but I’m not sure how the Xcanex would fare when compared to something in the same price range or even with the various smartphone scanning apps out there, which do pretty much the same. But I’ll leave that comparison to others to make (please do tell us in the comments below!).
So, here is what I want to complain about (of course hoping that the developers will fix this in the next software update): I just scanned about 100 business cards that I have collected over the years. The good part is that the scanner offers timed automatic capture (i.e. it does one scan ever x seconds) so you just flip those cards under it, one after the other and it captures them, no problem. But once I had them all scanned, I wanted to drag-and-drop some of the scanned cards from the perfecapture software directly into Evernote. Unfortunately, it doesn’t work.
OK, let’s do copy-and-paste then. I tried to select a couple of scans and paste them into an Evernote-note. Well, it doesn’t work either. It only works with single scans. And when selecting a single scan, you cannot copy it with your usual “Ctrl+C” shortcut. No. You have to click on the “copy” icon of the perfecapture software. I think that’s quite cumbersome!
Next problem: after I copied various cards into Evernote, I wanted to delete them from the perfecapture software. At first it worked (or did it?), but now I cannot delete any of the scans. I don’t understand why. Maybe I hit some shortcut that protects scans from deletion? To be honest, I haven’t bothered to check the manual on this (laziness, but also experience that manuals rarely help with these things). Anyway, if this is not a bug, I think it should be transparent to the user why deleting is not possible (instead of the “delete” key just having no effect at all).
So, how do I get this scanning job finished without losing any card by not saving it? My last resort is to save all scans in a temporary folder and then drag and drop them from there into Evernote. So I selected all scans and hit “save”. Well, unfortunately, perfecapture is now asking me for each and every scan to manually confirm the file name. And no possibility to select “apply to all” or something like that. And it takes about a second between the save-dialogues to come up, so here I sit, spending another two minute just to save those scans. Developer fail!


 This is a follow up to my previous review posts (